Introduction
Wallpaper can transform a room, adding personality, texture, and color. But what happens when it’s time for a change? Removing wallpaper might seem daunting at first glance, but trust me—it’s not as overwhelming as it appears. Over the years, I’ve tackled my fair share of wallpaper removal projects, from stubborn vintage prints to modern textured designs. Through trial and error, I’ve discovered four tried-and-true methods that make the process manageable, efficient, and even (dare I say) satisfying.
In this guide, I’ll walk you through each method step by step, sharing tips and tricks I’ve picked up along the way. Whether you’re renovating your home or simply updating a single room, these techniques will help you remove wallpaper with confidence. So roll up your sleeves, grab your tools, and let’s get started!
1. The Water and Fabric Softener Method
One of the most popular and budget-friendly ways to remove wallpaper is by using a mixture of warm water and fabric softener. This solution softens the adhesive, making it easier to peel off the paper. Here’s how we do it:
Step 1: Prepare the Room
Before diving in, protect your floors and furniture. Lay down drop cloths or plastic sheeting to catch any drips, and remove outlet covers for safety. Open windows or use fans to ensure proper ventilation.
Step 2: Mix the Solution
In a spray bottle, combine one part fabric softener (or dish soap) with two parts warm water. Shake well to create a soapy solution. If you’re dealing with particularly stubborn wallpaper, add a splash of white vinegar to boost the mixture’s effectiveness.
Step 3: Score the Wallpaper
Use a scoring tool or a wire brush to create small perforations in the wallpaper. This allows the solution to penetrate beneath the surface and break down the adhesive. Be gentle to avoid damaging the wall underneath.
Step 4: Apply the Solution
Spray the solution generously over a small section of the wall. Let it sit for 10–15 minutes, allowing the adhesive to loosen. Then, use a putty knife or scraper to gently peel away the wallpaper. Work in small sections to keep the solution from drying out.
Step 5: Clean Up
Once the wallpaper is removed, wipe the walls with a damp sponge to remove any remaining adhesive residue. Allow the walls to dry completely before painting or applying new wallpaper.
This method works wonders for most types of wallpaper, especially if the adhesive isn’t overly aggressive. Plus, it’s eco-friendly and cost-effective!
2. The Steam Method
If you’re dealing with older or heavily glued wallpaper, the steam method is your best bet. A wallpaper steamer generates hot steam that loosens the adhesive, making removal much easier. Here’s how to use it:
Step 1: Rent or Buy a Wallpaper Steamer
You can rent a wallpaper steamer from most hardware stores, or purchase one if you plan to tackle multiple rooms. These machines are easy to use and come with detailed instructions.
Step 2: Set Up the Steamer
Fill the steamer with water according to the manufacturer’s guidelines and let it heat up. While waiting, prepare the room by covering floors and removing outlet covers, just like in the previous method.
Step 3: Apply Steam to the Wallpaper
Hold the steamer plate against the wallpaper for a few seconds to soften the adhesive. Move slowly and work in small sections to avoid overheating the wall. Once the adhesive is loose, use a scraper to gently peel away the paper.
Step 4: Address Stubborn Areas
For areas where the wallpaper clings tightly, reapply steam and give it extra time to penetrate. Patience is key here—rushing can damage the wall.
Step 5: Clean the Walls
After removing all the wallpaper, clean the walls with a damp sponge to remove leftover adhesive. Let them dry thoroughly before proceeding with your next project.
The steam method is incredibly effective for tough jobs, though it does require a bit more effort and equipment. However, the results are worth it!
3. The Vinegar and Hot Water Method
For those who prefer natural solutions, the vinegar and hot water method is a great option. It’s simple, inexpensive, and works well for non-vinyl wallpapers. Here’s how to do it:
Step 1: Mix the Solution
In a bucket, combine equal parts white vinegar and hot water. Stir the mixture to ensure it’s evenly blended.
Step 2: Apply the Solution
Dip a sponge into the solution and apply it liberally to the wallpaper. Focus on one small area at a time, ensuring the paper is saturated. Let it sit for 5–10 minutes to allow the vinegar to break down the adhesive.
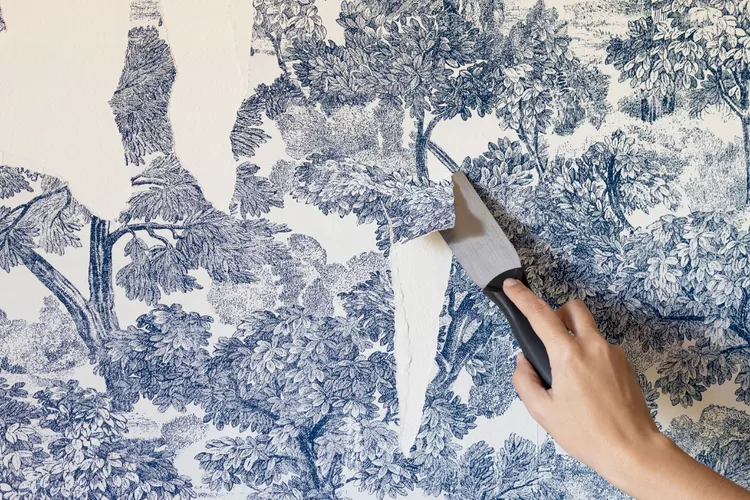
Step 3: Scrape Away the Wallpaper
Using a putty knife or scraper, gently peel away the softened wallpaper. If the paper doesn’t come off easily, reapply the solution and wait a bit longer.
Step 4: Clean the Walls
Once the wallpaper is gone, wipe the walls with a clean, damp cloth to remove any residue. Allow the walls to dry completely before moving on to the next step of your renovation.
This method is perfect for DIY enthusiasts who want a chemical-free approach. Just keep in mind that it may take longer for heavily adhered wallpapers.
4. The Dry-Stripping Method
Believe it or not, some wallpapers can be removed without any liquids or steam. This “dry-stripping” method is ideal for modern, strippable wallpapers designed to come off easily. Here’s how it works:
Step 1: Test a Small Area
Start by testing a corner of the wallpaper to see if it peels off cleanly. If it does, you’re in luck—you can proceed with this method.
Step 2: Peel Off the Top Layer
Using your fingers or a putty knife, lift a corner of the wallpaper and begin peeling it away from the wall. Work slowly and carefully to avoid tearing the paper. In many cases, the top layer will come off in large sheets.
Step 3: Remove the Backing Paper
Once the decorative layer is gone, you may find a thin backing paper still attached to the wall. Use a scraper to gently remove this layer, taking care not to gouge the wall.
Step 4: Clean the Walls
Wipe the walls with a damp sponge to remove any remaining adhesive or debris. Let them dry completely before refinishing.
This method is quick and mess-free, but it only works with certain types of wallpaper. If your paper doesn’t strip easily, switch to one of the other methods mentioned above.
Tips for Success
No matter which method you choose, here are a few additional tips to ensure smooth sailing:
- Work in Small Sections: Tackling too much at once can lead to frustration. Focus on one area at a time to maintain control.
- Protect Your Walls: Be mindful of the wall surface beneath the wallpaper. Avoid using excessive force or harsh chemicals that could damage the drywall or plaster.
- Take Breaks: Wallpaper removal can be physically demanding. Pace yourself and take breaks as needed to stay energized.
- Dispose of Waste Properly: Roll up discarded wallpaper and dispose of it in trash bags to keep your workspace tidy.
With these four methods in your toolkit, you’re ready to tackle any wallpaper removal project. Each technique has its strengths, so choose the one that best suits your needs and the type of wallpaper you’re working with. Remember, patience and persistence are key—even the toughest jobs become manageable with the right approach.
Now that you know how to remove wallpaper, go ahead and reclaim your walls. Whether you’re prepping for a fresh coat of paint or installing new wallpaper, the possibilities are endless. Happy renovating!